
Updated on April 12, 2016
Breathing underwater like a Jedi–LIES!!!
Update: sadly, none of this seems to be true. The Triton guys have returned all their money to their backers; their technology is not what they claimed. Here’s a link from our friends at Deeper Blue explaining the fiasco. So disappointing!
One of the (only) cool things about the movie Star Wars: The Phantom Menace was the little device Obi Wan and Qui-Gon stuck into their mouthes to breathe underwater–no heavy air tanks, no compressor to recharge, just a hand-held device you can carry around in your Jedi robes. According to Wookiepedia (god, I love the internet), the A99 aquata breather could supply oxygen to a swimmer for about two hours.
Guys. It’s real.
Triton, “the world’s first artificial gills re-breather,” popped up in an Indigogo email this morning. Charging off a lithium-ion battery, it filters oxygen out of the water.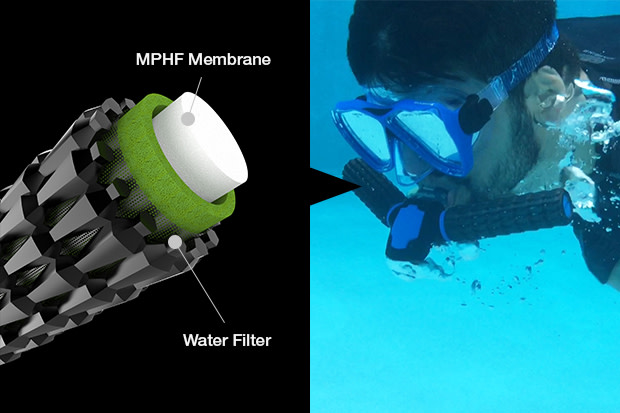
Photo from the Indigogo site. Visit immediately.
How amazing is this device for cruisers? It allows for hull cleaning, anchor recovery operations, or straight-up reef exploration for so much less money than the cost of a full dive kit. There’s no training like for SCUBA, it weighs next to nothing, and it takes up less space than your snorkeling fins.
Of course, there are limits. According to the website, the Triton only works for 45 minutes on a two-hour charge. Max depth is 15 feet, so you’re not taking it to the abyssal plain. And this is an Indigogo funding campaign, so there’s some risk to purchase–you’re investing in a start-up company that could still go under, taking your money with it. But still–this is the type of technology that makes me stand amazed at the world.
Updated on April 1, 2016
Giving everyone some space
Tired of looking at the engine yet? Not as tired as Michu. Let’s talk about something else.
Many people can get behind the idea of spending 24-7 in close quarters with adorable babies (possibly they have forgotten/never knew about the random screaming and poopy diapers). Most folks have fond memories of the Adorable Toddler Stage of human development. Not a ton of people we know would commit to sharing a 300-square-foot living space with a teenager.
F is currently 11, but by the time we’re done with this trip she’ll be a full-on teen, and we’ve discovered that teenage behavior seems to start long before the magic number 13. Therefore, the driving force behind any boat consideration when we were shopping was not a particular sail plan, tankage requirements or builder’s rep–it was interior layout. While plenty of folks cruise comfortably with two kids by splitting up the v-berth or sticking one child in the saloon pilot berth, we felt we would all be happier living abroad if every person had some private space.
This turned out to be more difficult than expected. Apparently, most people purchasing boat suitable for living aboard in the last 20 years are retired. The emphasis in monohulls has been on spacious aft berths, instead of splitting the aft living spaces into two separate rooms. Families have been flocking to catamarans, which are much more spacious and allow you to banish two kids to an entirely different hull; that sounds great to us, but there was never going to be a decent catamaran available in our price range. Used charter boats generally have more interior living space, but they also have less-than-ideal galleys, terrible anchoring setups, and a history of running aground.

Our search led us to consider some really weird boats in fairly far-flung locations, and I won’t get too in-depth about that right now; suffice to say, we think the Beneteau First series is a pretty solid choice for affordable family sailing. This particular boat has a reputation for being very well made–it’s not just a lightweight cruiser, sacrificing quality joinery for wide-open spaces. It gives each kid their own separate room, with a closing door and everything; plus, it’s got a secret passage between the rooms! (Some people would call it a second head, but we prefer “secret passage.”) We’re glad we made the decision to carve out personal spaces for our kids. At home, they share a bunkbed; as they get closer to departure, having their own room is one of the things they’re most excited about.


Mirror-image rooms, with the companionway in between…I think they have more room back there than we do in the v-berth…

That’s not the only way we’re trying to keep from losing our minds via family togetherness, though. We’ve also been amassing an auxiliary fleet: inflatable dinghy, smaller rowing dinghy, and a kayak. Need to get away from the fam? Paddle off for some quiet time. The kayak is really the best, and we’d like another, but we’re attempting restraint.

Finally: the Pod. If all else fails, on our boat you can climb in to a fabric cocoon and create your own little world away. This was a gift to F from her grandparents, but really, everyone loves it.


And if all else fails, you can always swim to the beach.

Updated on March 21, 2016
Engine Part 3b: Converting to Closed Cooling (the end)
At the end of my last post, the real time was early April 2015; I left off at a point where I was angry and frustrated at a small, hard-to-see, very stubborn piece of bronze. Sometimes there is no way out but forward. After my initial defeat I desperately needed a “win” before I started phase two of the bushing battle. The flywheel was right there staring at me, so I decided to go for a quick victory and remove it. It took me a while but I finally came up with a way to keep the motor from turning over while I unscrewed the large flywheel bolt.

With one minor victory under my belt, it was time to go after that bushing. I thought if I could drill out the majority of the bushing, then I would have a little more room with which to work and maybe I’d be a little more successful with the hacksaw blade.
 I scrounged up this antique right angle drill. Not variable speed, and the power cord looked like an electrocution waiting to happen. After repairing the cord, the bronze was ready to fly.

The drill-out worked really well. It took me about two minutes to drill this hole, including the time to take photos. It also reinforced my idea that I should have started with drilling out the bushing, and then I could have simply used a tap to cut new thread; however, this was no longer an option as I had already gone too deep with my relief cuts. The other thing the drill-out did was let me indirectly see (still using the camera to see what is going on) into the now bigger hole a little better. I could see that my relief cut at the 12 o’clock position still had a little ways to go. I got out the hacksaw blade and ran it back and forth for about ten minutes. I checked that the cut was parallel to the bore hole in the block. It was looking good, and after about 15 more strokes I heard a soft but distinct “click”. Could it be? I put a cold chisel on a flat spot and hit it with a hammer to spin the grommet counter-clockwise…and it moved!!! I added penetrating oil and, using the cold chisel and the hammer, I managed to spin it about four revolutions–but it didn’t unscrew. Was it not threaded? I used a little screwdriver and gently pried while I spun it and out it came!!! The dang thing was a pressed in bushing.


Now I needed a way to go from hose barb to smooth bore hole. My new plan was to cut threads in the side of the block. I wasn’t sure if the hole was the right size for a tap, and there was no way I could precisely bore out that hole with the engine inside the boat.
Let’s move on.
 The conversion kit came with two different gaskets for the water pump; the amount of metal overlap on the upper edge of the pump seemed awfully skinny. After a run to the hardware store for some mounting bolts (not in the serpentine belt kit), I selected what I thought was the correct gasket and bolted on the pump. There was a little rubbing when I spun the water pump over by hand. I took it off and sanded down coolant passage in the area where it was rubbing, after that it spun smoothly. Then I bolted on the new flywheel. I had just gotten the new alternator three days earlier, so now was a good time to lift it up an see how it fit.
It didn’t fit.
The large Racor 500 Turbine fuel filter I put in last year was in the way. I spent the rest of the day running back and forth for parts, and finally managed to move the filter aft to make room for the big alternator.

The next day I tried to lift the new heat exchanger/exhaust manifold in place.
It didn’t fit.
Come on, every other Beneteau First 38 has this exact heat exchanger on the same Perkins motor, it has to fit! I was laying in T’s berth working through the starboard side access hatch; from there I couldn’t see what I was getting hung up on. From the front of the motor I could see the sea water strainer was in the way–out it came. The new heat exchanger did not come with a way to connect to the exhaust hose, or add the cooling seawater to the exhaust line. The final problem (ok, not really the final one) was that the metal flanges on mounting feet of the new manifold are about 1/4 inch thicker than the flanges on the feet of the old exhaust-only manifold. The 30-year-old studs screwed into the exhaust side of the engine block were 1/4 of an inch too short. These studs would have to be removed and replaced with longer ones.
I used the two nut method to take out all of the studs: thread a nut onto the stud; then thread a second nut on while holding the second nut with a wrench; back out the first nut until the nuts bind on each other. I had doused all four of the studs with penetrating oil the night before and tapped on them lightly with a hammer. I have found that it sometimes helps with a stuck fastener to slightly tighten before you loosen. The idea is to break the seal made by the rust and not to break the bolt or stud or whatever you are removing. Once it wiggles, keep adding oil and keep wiggling, and it will eventually come out. The first stud came right out, and the next one came out with a little heat. Studs three and four were stubborn, but I had time to let the penetrating oil soak, so I moved on to other projects (fresh water system) and would return every couple of hours to apply more heat and oil.

At home I had to deal with the geometry problems of the exhaust. Maybe I should explain wet exhaust. On the VW diesel car the hot exhaust travels through a metal pipe led under a metal car. It gets hot. It will burn you. Luckily, it is out of the way unless you decide to crawl under you car. On our boat, the hot exhaust travels out through a rubber hose which snakes its way from the motor to the transom. If water is not added to cool off the spent gasses, the exhaust would melt the hose. The other option would be to have a hot metal pipe running through the boat. I took the old exhaust elbow, which has passages to add water to the exhaust, off of the old manifold. I then spent the money at a local welding shop to have a small aluminum extender made, as well as a flange for the elbow so I could plumb in the water.
I returned to the boat in the middle of May. The hole in the side of the block was 1 1/8 inches, which is just about the right size for cutting one inch pipe threads.


Two days later, I could screw a hosebarb into the side of my motor. At first I was nervous about the tap going in off-center, but once it got started, it cut smoothly. Pipe thread is tapered, so the deeper the cut, the more cutting surface of the tap is engaged. It gets a lot harder to turn the tap. In the beginning I was cutting little chips; then at the end, I needed so much pressure that I was worried I would break the tap. So, I mostly wiggled it back and forth, each time moving it a little more forward, now making more of a grey metal paste instead of chips. Way slower then simply cranking on it; also way safer.

I got the last exhaust stud out using paraffin wax. I put a wet rag on the stud and heated up the block around it with the MAP gas torch. Then I removed the rag and rubbed the solid paraffin on the base of the hot stud; the heat melted the wax, and the cooling action of the hotter metal engine block wicked the melted wax into the threads. The stud slid out like butter. It worked so well, I used the same system to swap out the thermostat housing studs. Paraffin wax for stuck fasteners from now on!


The cross flow pipe was in–but in the configuration intended by the guy who designed the kit, I was unable to swing the alternator on its hinge. The alternator has to be able to move in and out in order to adjust the belt tension. I went to bed thinking if only the pipe was hose, then I could bend it wherever I wanted.

I am notoriously bad at brazing pipe–it always leaks. After the soldering was done and the hose clamps were tight I did a test run, filling the engine with water and… then the water came pouring out from behind the circulating pump.
The tan gasket fit the motor, but it didn’t fit the pump. The black gasket fit the pump but it didn’t fit the motor (tiny gap at the top). When I first installed it, I held the gaskets up to the pump and I selected the black one; like a doofus, I never checked the fit against the engine block. I remembered the little bit of interference when I first bolted it on. I rang up the diesel parts guys and explained the problem.
Perkins guy: So, you say it doesn't fit and it's really leaking. We've never had that problem before. Are you sure it's a Perkins 4108?
Me: Is there an adapter plate that goes between the water pump and the engine?
Perkins guy: Let me see... Yep, it looks like there is.
Me: I'll take one.
Perkins guy: Do you want to know how much?
Me: Sure. *Thinking...what other options are there, anyway?*
Perkins guy: Twenty-five dollars.
Me: Great. Send it.
Now it was early July, and, adapter plate in hand, I made another trip. I was thinking about the anemic water flow the last time I winterized the engine, and how much scale had built up after 30 years in lake Texoma. So, I also brought up an electric pump and a gallon of concentrated engine de-scaler.

July 15th, two weeks after last year’s launch, I finally had the whole thing put together. I fired up the engine on land, drawing cooling water from a bucket with a running garden hose in it. Three and a half months and maybe 50 hours; maybe more, and now we have a closed cooling motor. To be fair, in the previous three months I also removed three unneeded through hulls, glassed in the holes, built the new mast from parts, did a full bottom job (five coats of barrier coat and two coats of antifouling paint), and I rebuilt the entire freshwater system.

Next up in Engine Part 4: The Frankenstarter.
Updated on March 12, 2016
New Saaaaaaaaaail!
Here are some things you’ll never hear on our boat:
"Time to peel to the half-ounce."
"I don't think there's enough room at the committee boat."
"Hike, b*tches!"
Here is something you will hear, hopefully often:
"Let's bust out the code zero!"
Cuz we’ve got a brand new sail, people!!
Here’s how it went down. Michu was cyberloafing on eBay, “researching” fishing reels, as one does in February in Wisconsin, when his fingers casually sauntered over to the Used Sail section of the internet. What he found was a lovely new sail billed as an asymmetrical cruising spinnaker. Now, as we’ve established: we’re big fans of the actual “sailing” part of our trip. Our boat is on the lighter side for a cruiser, which means–among other things–she’ll be happily pushed along in a zephyr, as long as we have a good sail for the conditions, which will often mean a spinnaker of some kind–the pretty, poofy, colorful sails that stand out from the front of a sailboat. This sail was in brand-new condition, made for a boat similar to ours, and cheaper than we’d expected to pay. Should we bid?


Photos by Somerset Sails. Looks good, right?
Instead, my forward-thinking husband phoned the sailmaker to get more details. Martin, of Somerset Sails in upstate New York, gingerly explained that the sail was not actually what most people would consider a traditional asymmetric spinnaker–it was more of what’s called a “code zero.”
On the other end of the line, Michu and I broke out into silent disco.
A code zero is a great all-purpose spinnaker for us. Designed to be almost a cross between a genoa and a traditional spinnaker (a little less poofy, y’all), it’s easier to control and can be sailed at a higher angle–closer to the wind. It’s a very versatile sail; it should do a great job when winds are light and aft, AND increase the fun factor for us by a lot.
Martin the sailmaker arbitrarily knocked a couple of hundred dollars off the price and threw in a fully-rigged Chutescoop at cost. This huge fabric tube can be raised and lowered over our sail to keep it under control, making it even easier to use. Why was he throwing us this amazing deal? A client had ordered a whole new suit of sails, but on unpacking the code zero, decided he didn’t like the color.
The color. I’ll just let you absorb that for a moment.
Fortunately, Martin had already made his money on the rest of the sails that the guy bought. His aesthetic rejection, our gain; we’ll learn to live with the bright yellow.

Posted on March 9, 2016
Travel versus sailing
Among cruisers, there’s a tendency to self-categorize between those who sail to travel–experiencing new cultures, meeting new people, seeing new things; and those who are in it for the sailing–feeling the breeze in your face, listening to the sound of the waves, moving your boat through space with just the power of the wind. Michu and I can’t quite seem to take sides.

Michu and I met while teaching sailing. Our non-sailing friends seem to think this is wildly romantic and adorable and somehow unusual if not unique, but our experience has been the opposite–we know dozens of people who’ve met and then married thanks to sailing, and meeting someone while covered in stinky lake water with a shocking sunglasses tan is not particularly meet-cute. We were both deeply sunk into the sailing life before we met, and while we might have individually harbored rose-colored ideas about the live aboard life, our focus was on going fast. Especially on Lake Michigan keelboats, E scows, or Badger Techs (ok, maybe there was not a lot of “fast” going on in that last fleet, but…pretty fun!).

Nothing about our boat is set up for racing, including the two available sailors for a boat designed to be raced by eight, but the racing mentality is hard to shake. This summer, we were motoring past Sheboygan in flat water when we were joined by two other boats, both motoring. Of course, we immediately started racing them. While motoring. “Looks like the blue one is gaining…should we maybe put up the main, try and catch this little bit of breeze? It might be filling in a little bit further out…”
We totally dusted them, by the way. I can’t believe they didn’t pop their kite.
The best day we had this summer was not a day spent exploring a new town, or relaxing on a beach, but a 10-hour reach down the Wisconsin shore in 12-15 knots. We baked bread. We read. We played games. Mostly, we sat in the cockpit and stared at the sails…because we love it. Our hearts sing and our minds clear and it is our best place.

However. That’s not why we’re taking our kids on this adventure. Having lived abroad for a few years in my impressionable youth, I know something about the character-forming nature of travel. We’re driven to expose our kids to other worlds, and broaden their experience beyond this lovely little patch of Wisconsin we call home. Two of their four grandparents were born in Cuba, but they couldn’t tell you anything about that country; this way, they’ll be able to spend a whole month there.

At the same time: we love traveling for ourselves. Since having kids and putting the lockdown on our finances, we have barely left the state. Our kids haven’t been on a plane since T was a baby, and Michu’s previous passport was issued when he was not long out of high school. Michu has lived in Madison for twenty years straight, and I’ve now spent more years here than I lived in my hometown growing up. We feel the need to move, to shake things up, to change the view.
Bottom line: we’re in it for both. It’s pretty much the best mix for us–sailing, exploring, and having a home to stay comfy, with a kettle on the stove and all.